Wednesday, December 12, 2012

The Quiltinator


I, Melisa Hart, am a fashion designer and garment sewer who has always insisted I did not enjoy sewing anything “quilt” related. 
 
But then last week I took Lewis’s baby quilt class and made this Little Red Riding Hood quilt and I had fun.


Not to brag, but look at that mitered corner on the binding!  I deserve real brownie points for that one. Just saying.

I enjoyed it so much I made a second Emu Love quilt.


 And then I made a third Pirate quilt.

Yes I did climb up on my table to take this picture.  Why do you ask?


I'd like to point out that I rocked the stitchin' in the ditch on this one.


You may now refer to me as The Quiltinator if you wish.


Happy Sewing
~Melisa & Cordelia

Friday, November 30, 2012

Aprons, Models and New Help.


Haaaaave you met Heather?


If not, Heather is one of my newest Stitchology helpers/buddies/amazing people.  I love Heather, not just because she gives me free gifts and buys me lunch, but because she is an incredibly talented textile artist who got me back into embroidery.
 And because she volunteers her time at Stitchology. 
 And she buys me lunch.

Well the other day Heather and I decided to make some aprons because it was the right thing to do.

In her free time Heather masquerades as a pharmacist (and by masquerades as a pharmacist, I mean, she really is a pharmacist) so she just had to use the apothecary fabric for her apron. 


 It’s a good thing she did because it turned out REALLY REALLY cute.   
You sew girl!

For my apron I decided to use some of my Christmas fabric, because I needed more Christmas samples so the dress forms in the window would all have something to wear. 


 Can you imagine having naked dress forms in a Christmas window display?  Turns out, a lot of people feel really uncomfortable around naked dress forms so that could start a riot or two. 
I couldn’t let that happen; I can’t afford the bad press.

We put on our aprons for a photo shoot, but we were feeling a little goofy after a day of sewing so we started making fun of the models on the Vogue pattern page we had been looking at earlier that day.


But seriously, who thought this would be a good pose?


You can’t even see the garment!


It doesn't look much better on me.
And it makes me look funny because it is really hard to stand still on one leg.

Or what about this one?


I just don't get it. Please explain.


Happy Apron Making
~Melisa & Cordelia


Thursday, November 29, 2012

Embroider Me This.


So a while back Heather insisted I get my little tush in gear and order some Sublime Stitching embroidery patterns. 
 At first I wasn’t all that excited to do so because it has been a long time since I did any embroidery and I just was not in the groove of it.  But then I caved in and went hog wild and ordered TUNS of the amazing patterns. 
  I sure am glad I did because I have since been on an embroidery frenzy.  Turns out I LOVE to embroider. 

What have I been embroidering you may wonder?
 Well I’ll show ya.

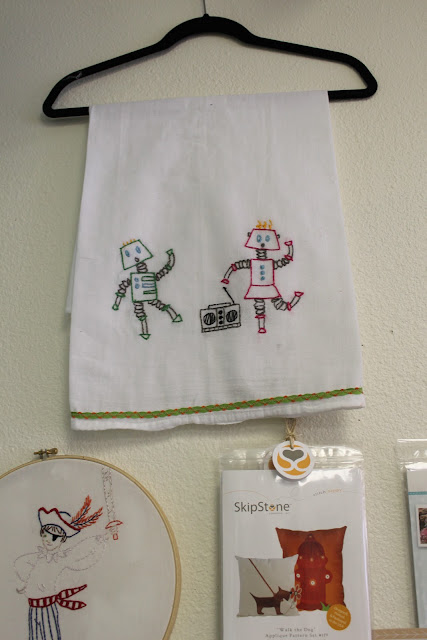
I’ve made a few dish towels…..


Dancing robots cause they are funny and.....


reindeer cause Christmas is right around the corner.


I’ve made a few wall hangings…..


Pirates because I plan on celebrating Talk Like a Pirate Day all January or perhaps March long (I know the real day is in September, but I didn’t want to wait till then).


A girl getting blown away in the wind because it was cute.


And recently I’ve discovered these plane black hooded sweatshirts at Costco.


They make me feel the need to add some color so I have been adding embroidered robots and Matryoshka dolls. 


 Only I left my Matryoskka hoodie at home so you’ll just have to imagine it.  It’s awesome and has way more embroidery than the robot.

But seriously, embroidery is oober fun and with all the great new Sublime Stitching products, like this super cute tool kit,


 and the beef cake patterns,


 it’s hip too. 

 So you should probably stop by Stitchology soon to get inspired and to join our hand work club that meets every second Tuesday of the month from 10-12.  Do it, you’ll love it and you too can have a closet full of custom hoodies.

Happy Embroidery
~Melisa & Cordelia

Saturday, October 13, 2012

Sewing the Trick Or Treat Sack.


Are you ready to sew up your very own Halloween bag? Well let’s get sewing.


Note: All seam allowances are ½” unless otherwise specified.


First you will need to cut your fabric.
I used 2 fabrics, the apothecary jars and the dots.


From the Apothecary jars I cut:
2 rectangles 15” x 4”
2 rectangles 15” x 18”


From the dots I cut:
2 rectangles 15” X 15”
2 rectangles 17” X 5”


From a mid weight fusible interfacing cut”
2 rectangles 15” X 18”
2 rectangles 17” x 5”


Now that you have rotary cut all the fabric you are ready to get sewing. Start by laying the smaller apothecary strip on the dot square piece with right sides together. Line up the 15” edge, pin and sew. Repeat for the other side.


Fold the apothecary strips up and press the seams flat.


Fuse the interfacing to the back of both pieces.


To create the Black Death Brew label I got onto Martha Stewart’s website and found a label I liked. I used Photoshop to adjust the size and customize it a bit. Once I was satisfied, I printed it onto the photo fabric that goes right through the machine. This is cool stuff, and if you don’t have any already, you should probably rush over to Stitchology and get some. (Only don’t rush too fast because it has been backordered for a bit and we are all out).


Trim around the label you printed, place it on the bag where you want and sew around the edges. I chose to leave the edges raw to give it a spookier look.


Once you have applied the label, lay the pieces together with right sides together. Pin and sew the 2 sides and bottom edge of the bag.


Clip your corners so things will turn nice and clean.


Turn the bag right side out. It should be looking purty snazzy at this point.


Now you are ready to sew the lining of the bag. To do this, put your two larger apothecary rectangles together with right sides together. You will sew the sides and bottom, but this time you need to leave an opening to turn the bag through so leave about 5” open in the bottom.


Now we will move onto the handles.


Start by fusing the smaller interfacing rectangle to the wrong side of the smaller dot rectangle.


Fold them in half (with wrong sides together) lengthwise. Press.


Open the fold up, and fold one edge to the center crease and press.


Repeat for the other edge so both sides meet up in the middle.


Fold in half again and press. Edge stitch both long sides to keep everything in place.


To attach the handles, place them to the wrong side of the bag where you want them. Make sure they are laying the same direction as in my picture, and that they line up on both sides of the bag.


Baste in place.
Slide the bag into the lining so that right sides are together.


Match up the top edges and pin in place. In a perfect world your seams will line up.


Sew around the top edge.


Now you can pull the bag out of the lining through the hole we left in the step above.


Sew up the hole in the lining and push the lining to the inside of the bag. If you like, edge stitch around the top of the bag to help everything stay in place.


And there you have it: A truly terrifying Halloween bag that everyone will be envious of!


Happy Halloween
~Melisa & Cordelia


Friday, October 12, 2012

Halloween Sewing: Trick or Treat Sacks.


I don’t know about you, but it has been a good long time since I have been Trick Or Treating.
Well, if you consider almost a year to be a good long time, which I do.

My time spent as a Trick Or Treater has taught me some good lessons, one of which is that it is all about the sack. You have to have the right sack because if you end up with one that is too small, or flimsy you will end up with a candy emergency. Imagine, if your bag is not big enough you will not collect enough loot to last you till Easter which is a serious tragedy. Or if you have a weakling of a bag that caves under the weight of all the delectable chocolate and brakes and you will loose your supply, especially if you happen to be Treating with an older brother.
So Sad.

 
So this year I decided to sew up the ultimate Sack. I wanted it to be roomy, sturdy, but also cute. So I made this little guy.

The intimidating skeleton keeps all unwanted visitors our of your candy stash.


 It is such a great sack and totally easy to make, so I know you can whip up your own in no time too. And, because I am feeling especially generous, you can check back tomorrow for the directions!


Happy Halloween
~Melisa & Cordelia

Wednesday, September 26, 2012

Ballooning

For those of you who are not familiar with October in New Mexico, every year the Balloon Fiesta comes to town and it is a massive celebration of all things hot air and balloon shaped. This year I decided to get into the mood by creating a little balloon themed window display at Stitchology.


For starters, I decided to make about a billion felt balloons and a few fluffy clouds as well. I hung them all from the window and it was a good thing, but I couldn’t help but feel that I needed to take the theme a little further, so I used the Hot Air Balloon fabric I had just received and made some little outfits.


Like this.


I used the Oliver + S Family Reunion Dress pattern and sure am glad I did. This pattern, like all Oliver + S patterns, sewed up well, had great directions and is totally adorable.


I mean how can you not LOVE the little neck facing detail?


Or the buttons down the back?


Or what about the hem facing and decorative stitching?


Sigh.

I was having so much fun with my balloon fabric that I decided to make a dress for the larger form as well.


For this gal I used the Oliver + S School Photo Dress and it also sewed up like a dream.


I used the scraps from the first dress to cut out a few balloons and appliquéd them around the hem.


It was the right thing to do and the dresses are stunning together in the window!


Happy Sewing
~Melisa & Cordelia