Thursday, June 30, 2011

Me Made June Days 23-39

Sorry for the delay on Me Made June updates.  My picture taker (aka The Papa Hart) went out of town for a long weekend making it extremely difficult for me to take my pictures.  This means I may or may not have been playing catch up by taking a weeks worth of pictures in one evening. 
 But regardless of how well I’ve been documenting my experience, the important thing is that the month is almost over and I have made it every day and am expecting a strong finish!

Day 23
Skirt:  Me Made.
You may recognize this skirt because, although I have not yet worn it, I have worn two others made from the same pattern.  Oh, and this is one of the skirts I made back in Feburary for the ETA Dallas challenge.
T-shirt:  Target.  Where else.
In case you didn’t know, I have been teaching a couple classes at Summer Prep, the kids summer camp sponsored by my high school, and here I am posing in my classroom next to the beautiful Berninas Ann Silva generously lent to me!

Day 24
Today was the last day of my fist session of summer camp which means the day was full of unpredictable games bbq's and such so I dressed down a bit and donned my beautiful Tie Died t-shirt.  I realize this is a bit of a stretch on the challenge, but I’m going to let it slide.
 Day 25

Blouse:  Me Made.  I used some old lace napkins to make the top.  Antique glass buttons adorn the back.
There may or may not be a button missing.  Who sewed the buttons on?!
Demotion! 
I demand a Demotion. 
Oh wait, it was me?
In that case, I'll let it slide.
Shorts:  TJMaxx but altered by me.

Day 26
Um, it was Sunday and I had nowhere to go so I never got dressed. 
Give me a break, everyone needs a lazy day sometimes!  But check out those Me Made PJ bottoms, so challenge requirements are satisfied!

See all that smoke in the background?  That's from the Los Alamos fire because the entire state of NM is trying its best to burn up.  Thank goodness for all our firefighters!  Thank you Danny and Geoff!

Day 27

Skirt:  Me Made.  What can I say?  I love this skirt and there are no rules that I can’t re-wear the same garments!

Day 28
Dress:  Me Made.  This is my new favorite favorite dress.  It is a wrap dress and is super comfy and has wonderful inseam pockets which you can read all about in yesterday’s post.


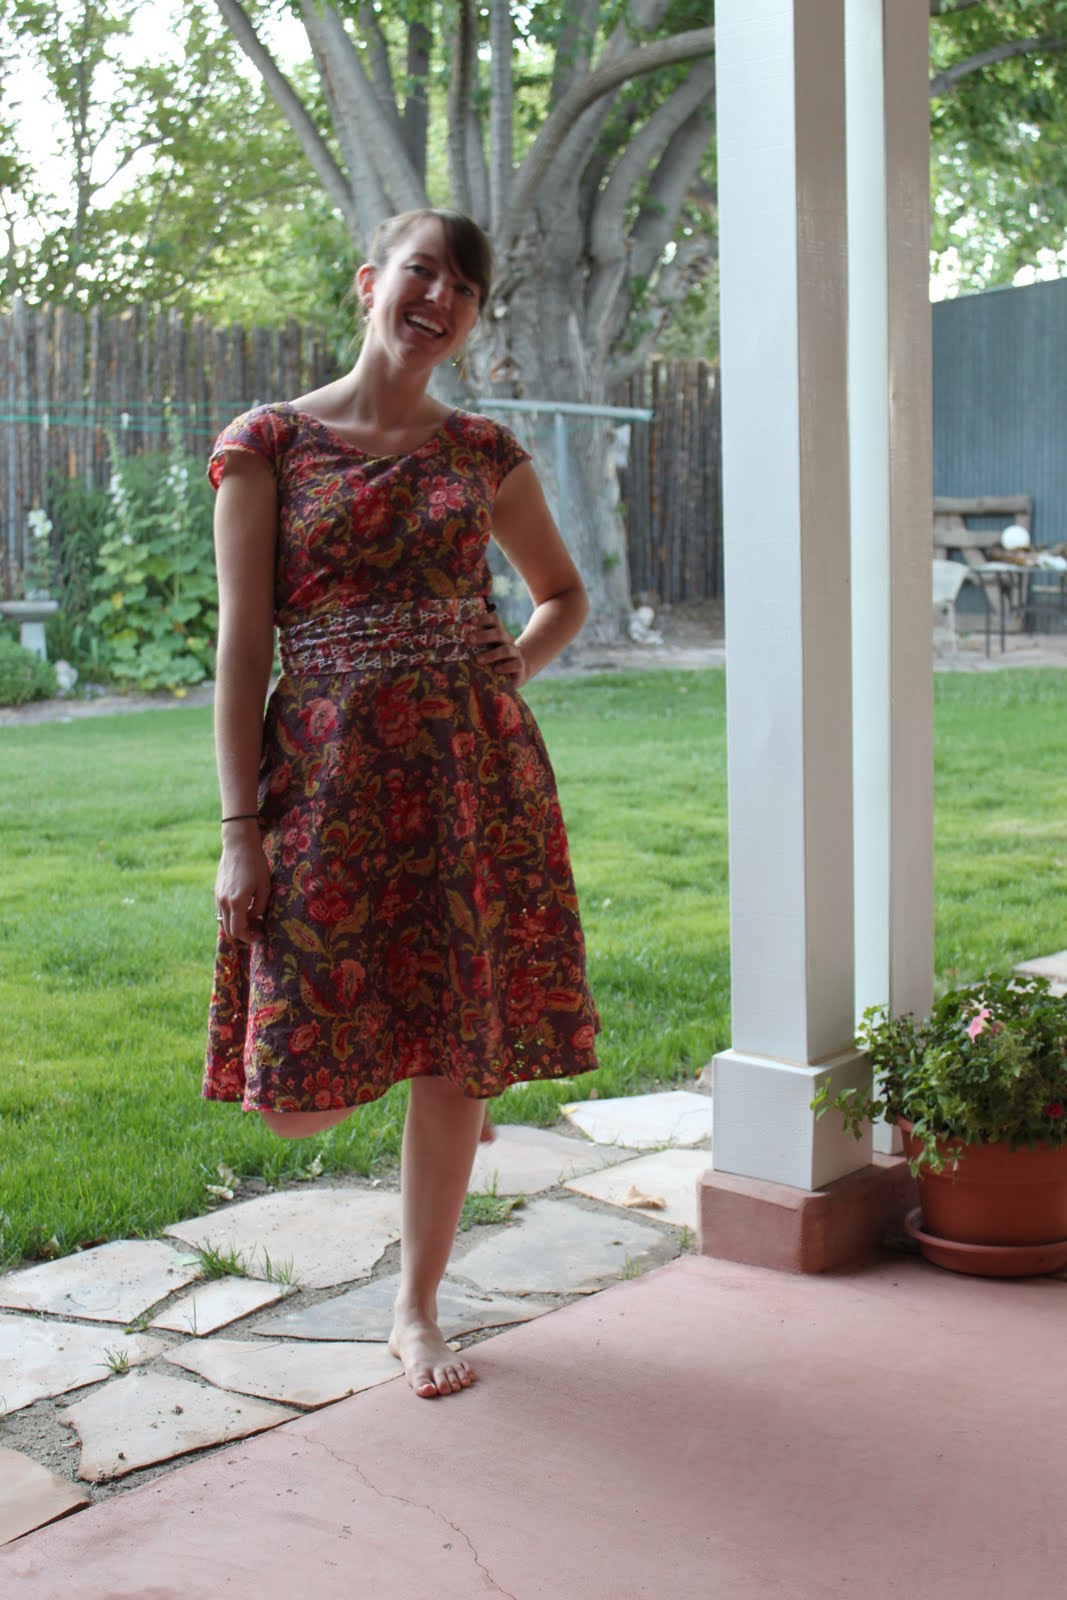
Cordelia was so jealous I got to wear the fabulous dress that she chopped of my right leg in a freak burst of anger.  It's OK though, I forgive her and maybe I'll make her her own dress.

Day 29
Skirt:  Me Made.  This may be my all time favorite pencil skirt.
Blouse: Old Navy?  I don’t remember cause it’s been in my collection for so long.

There you have it.  Only one more day to go! 
Will I make it? 
Will I cave under the pressure?
Will I run out of Me Made garments and give up in frustration?
Check back tomorrow (or next week cause I'm going out of town and may be busy) to see the exciting conclusion to Melisa and Cordelia's Me Made June 2011!!!!


Happy Sewing
~Melisa & Cordelia

Sunday, June 26, 2011

Make Your Own Inseam Pockets!

One of my lovely readers has asked for a tutorial on how to sew an inseam pocket, and so, just in time for all the sun dress sewing we’ll be doing this summer, here is a tutorial.

Prepare to be amazed by how easy it is to sew an inseam pocket, and the best part is that you can add this pocket to just about any garment.


Start by either drafting a pocket pattern or borrowing one from a different pocket. All you need to do is make sure you trace the shape of the side seam of the garment to the side of the pocket and make sure the pocket is big enough for your hand!


I usually just trace around my hand to get a good pocket. I also like to add notches to the pocket and the skirt so it is easy to line everything up while sewing.

Cut out 4 pocket pieces.

With right sides together, lay one pocket piece to the skirt front with the side seams matching.


With right sides together, lay the corresponding pocket piece to the skirt back with the side seams matching.


Repeat for the other side.

Take a piece of twill tape and lay it on top of the pocket piece within the seam allowance. This adds stability and will prevent the pocket from stretching out of place.
If you don’t have any twill tape on hand, you can use a bit of the selvage of the fabric instead.


Sew the pocket to the skirt using the same seam allowance as you are using for the rest of the garment.
Repeat with the remaining 3 pocket sections.

Press the pockets out away from the skirt.


With right sides together, line up the skirt front to the skirt back with the pockets flipped out.


Sew the side seam down to the top of the pocket....

 Pivot, and  sew around the pocket....


 Pivot again and finish sewing down the side seam.


Press the pocket towards the front of the garment.

Go ahead and clip the skirt back seam allowance at the top and bottom of the pocket so you can press the seam allowances open.


Finish your seams however you want and make sure the pocket is pressed towards the front of the garment.

And there you have it, an inseam pocket!


Enjoy.

Happy Sewing
~Melisa & Cordelia

Tuesday, June 21, 2011

Me Made June Days 18-21

I’ve been participating in a sewing challenge where I have agreed to wear something I made everyday for a month and document the experience.

This means Cordelia has been missing from several of my posts this month which makes her very, very, very cranky and a little jealous. Which is understandable, I guess, as the blog is all about her.

I tried to make amends by including her in my me made challenge, which worked for exactly one day, but has done wonders to sooth her wounded ego.

Day 18


Me:
Skirt: Me Made
Blouse: Old Navy

Cordelia:
Skirt: Me Made using the same pattern as my skirt, cause it’s cool to match your dressfom.
Betcha didn't know that!
Blouse: Target


Day 19:

I didn’t get a picture today, but I wore the t-shirt I tie dyed. I know it’s bending the rules a bit, but I don’t care. Sometimes you just need a comfy t-shirt and shorts!

Day 20:


Skirt: Me Made. This is one of the skirts I made for the sewing challenge back in February.
Blouse: Old Navy


Day 21

Skirt: Me Made. This one’s been around before but it is so super comfy and flowy that I love to wear it.
Blouse: Target.


There you have it.  More Me Made June pics to come soon.

Happy Sewing
~Melisa & Cordelia

Friday, June 17, 2011

Me Made June Days 16 & 17

Cordelia and I are back for more Me Made June Challenge action!
What does that mean? 
 It means I’m still wearing at least one article of me made clothing a day, and, even more impressively, I’ve been really good about taking my picture everyday!


Day 16


Skirt: Me Made using my own pattern. It has an European Turned Underlinging which you can read about here!

Blouse: Target
Belt: Thrifted


Day 17


Blouse: Me Made using a Sew Serendipity pattern.
Shorts: Um, I think they came from Target?

I like to call this my camo blouse even though it looks nothing like camouflage.

Why? You may be wondering?
Well I tell ya!
It’s because when I wear it, I blend in with my work chair.
Cause the chair is covered in the same fabric.
So it’s like I'm a chameleon and I blend in.


Get it?

You can read all about the chair and the blouse here if you wish.

Which you should, cause it’s an intriguing story full of torrid office romances, disappearing acts and Harry Potter!


Happy Sewing
~Melisa & Cordelia

Wednesday, June 15, 2011

Me Made June Days 11-15

It’s time to report on Me Made June Again! If you want to know more about the challenge, check out this link.
http://sozowhatdoyouknow.blogspot.com/2011/04/me-made-june-join-me.html
I’m having a lot of fun with this project, and I’m thinking I may need to continue the challenge in some form beyond the month of June. Perhaps I’ll wear something I made at least once a week? Twice a week? I’ll think on it.

Day 11


Dress Me Made of red polka-dot knit. I was headed to a wedding with a red, white and black theme so I pulled out the red dress.

Day 12


I forgot to take a picture of this day, but I wore the same blouse as last week so I recycled the picture—although I did wear different shorts.
The sleeve and body fabric are all from the same cut--the sleeves were just cut from the boarder.
Day 13


Blouse: Me Made. I used an old table cloth and a highly modified vintage pattern.
Shorts: Anthropology. The best part-they were on sale and then on sale again!

Day 14


Skirt: Me Made. Do you recognize the pattern? I wore the same skirt but made in different fabric already this month.

Blouse: from some boutique in Bloomington, IN, which means it dates back to my college days.

Oadie likes to get into the pictures with me…what a pain. Shortly after we took this picture, he went and caught a snake. Let’s just say I didn’t handle that too well. I’ve said it before, and I’ll say it again,
 I DON”T DO SNAKES!

The little pain just drug a lizard into my studio. Perhaps he needs a BIGGER bell?

Day 15


Blouse: Me Made. This is a variation of the blouse I wore on the very first day of the project!
Jeans: Loft

That's All Folks!
I'll see you in a few days for more Me Made June action packed updates!

Happy Sewing
~Melisa & Cordelia

Tuesday, June 14, 2011

Anthro Knock Off Skirt The 2nd

I’ve been doing it again….copying skirts I see on the Anthropology website. I can’t help myself. They have such cute things with such high prices.

This skirt was a breeze to make and, due to 3 layers of elastic, is super comfy to wear.


I usually don’t like myself in elastic waist band skirts because they do funky things to my hips—aka make them look ginormous, but in this case, the wider waistband is quite attractive, at least I think it is.


I added 3 snaps to the front to help secure the elastic in place, but also to keep the skirt from looking too cutesy as skirts made of large floral prints may do.


It also has a front placket which is strictly decorative and would look great with snaps all the way down.  In fact I tried to add snaps all the way down, but my snap tool and I were not getting along and I ruined an entire box of snaps in the process, so I decided the skirt looked great just as it was.
And there you have it, my new all time favorite skirt ever! I’m sure I’m going to add a few more to my wardrobe soon, and I’m hoping to write up a tutorial on how you can make your own!


Happy Skirt Wearing
~Melisa & Cordelia

Friday, June 10, 2011

Me Made June--days 8-10

Welcome back to Me Made June at The Cordelia Files. I am still going strong—wearing at least one garment I made each day—and now I have help taking pictures so documenting has become waaaaay easier.

Here are days 8-10


Day 8:


Skirt: My Me Made birdy skirt.
Blouse: Target? It’s hard to say—I’ve had it in my closet for ages.


Day 9

Blouse: Me Made. This was a bit tricky cause the fabric kept on growing and growing, and growing.
Shorts: I picked them up at TJ Maxx some years ago and have altered them a bit.

Day 10


Skirt: Me Made. It’s my new favorite skirt so you will probably see at least one more of these.
Blouse: Old Navy.
Shoes: Born and oh so cumfy
***Look!  I DO own (and occasionally wear) shoes!  What a shock.***

 
And there you have it. 

Happy Sewing!
~Melisa & Cordelia


Thursday, June 9, 2011

Fabric Flowers for Every Occasion


Yesterday I promised to show you how to make this fabric flower, and I will do just that if my pictures ever load.


Let’s hope they hurry up and load because these flowers are great for belts, hair accessories, decorating bags…and I’m sure they have a billion more uses I just can’t think of any at the moment.

So let’s get started.

Step 1. Cut


Cut 4 squares of fabric 3 ½” wide.
Cut 5 squares of fabric 2 ¾” wide.
(My fabric was a little on the light side so I cut twice as many squares and placed them with wrong sides together. From now on I will treat the two layers of squares as one piece.)


Step 2. Fusie Bond the Base


Cut a scrap of Heat and Bond (or any other fabric fusie tool) and iron it to the wrong side of a scrap of the fabric.


Peel off the paper and iron a second scrap of the fabric on top of it.


Cut all the layers into a circle that is approximately 2 ½” in diameter.
Alternatively, you could simply cut a circle of felt—I just didn’t have any on hand.


Step 3. Shape the Petals


Take a square and fold it in half diagonally.


Fold it in half diagonally again.


Take the top layer and fold it in half.


Flip the petal and fold the new top layer in half so both sides match.


Cut a curved shape into the top so that when you open up the petal it will look like a flower.


Repeat with all remaining squares.


Step 4. Foldin’ and Sewin’


Take a large petal and fold it in half.
Fold it in half again.
Pin this quarter petal to the flower base with the pointy end in the center of the base.


Repeat with the remaining 3 large petals.


Put on your free motion foot and lower the feed dogs on your machine.


Place the flower under the foot and sew the petals to the base by moving the flower in a circular motion. Don’t forget that the faster you move the fabric the larger the stitch will be, so I always start and finish by taking a few stitches without moving the fabric to secure everything in place.

The closer you stay to the center, the fuller the flower will be.


Repeat with 4 of the smaller petals.

It's getting there!


To create the center of the flower, take the remaining small petal in half.
Roll it to form a spiral.


Place the tip in the center of the flower and sew down.


Fluff the flower up, and you are all done with the flower.

You can sew it to a length of ribbon and add a snap to make a belt, or you can sew it to a bobby pin or barrette to tuck into your hair.
Alternatively you can sew or hot glue on a pin back and you can pin it to bags, jackets, dresses, hats—whatever you want.
Get creative!

Happy Flower Making
~Melisa & Cordelia