Sunday, October 31, 2010

Trick or Treat?

Happy Halloween everyone!


So this evening I was laying around watching a creepy movie, because that is what you do on Halloween, when I heard a large thud from the other room. I assumed one of the cats was banging around so I ignored the sound and continued watching my movie. After my film was finished, I staggered into my cutting room and noticed an unfamiliar detail on my glass doors leading to the balcony.


I tried to take a picture but due to the night time lighting and an unfortunately placed street light it was difficult to get a good shot.


After closer inspection, it was evident an owl had flown into my window and left an extremely clear impression behind.


Some Native American cultures have strong taboos against owls and believe them to be symbols of evil and death. The Apaches, for example, view the owl as the most feared of all creatures and believe them to be the embodied spirit of Apache dead.


After a little research I learned that Russian cultures too believe the bird announces death and disaster.


How appropriate this happened on Halloween.

Luckily for me, not all cultures believe the Owl is evil. Many credit it as a symbol of intelligence, brilliance, perceptiveness, intuition, quick-wit, independence, wisdom, protection, mystery and power. It has been said, “if an owl has visited you, an incredible gift has been bestowed.” And that “animals are only called to those who share the same energy.”


So is my owl encounter a sign that something terrible will happen to me in my sleep, that I am a wise intelligent person, or merely that my glass doors are a little too clean? I guess only time will tell.

Oh, and in case you were wondering, I searched for an owl body but found none, so I suspect that besides a terrible head ache my little owl friend is doing just fine.

Happy Halloween
~Melisa & Cordelia

Thursday, October 28, 2010

Twila Gets a New Dress

Have you met Twila?

“Hello Twila” Says Cordelia.
“Hello Cordelia” says Twila.


Waaaaaait that’s not a picture of Twila.
That’s a picture of a pair of Elephant boxers I made for a movie.
Sorry Twila, I guess I don’t have any pictures of you on my new computer.

Well Twila is a long time family friend and she has recently been going through a weight loss boot camp and has lost a bunch of weight.


Now that she is looking stunning she has decided to have me make her a dress that actually fits cause all of her old clothes are too big!

You go girl!

We are all excited for you and think you look absolutely fabulous daaaarhhling.


Twila and I picked out a Coni Crawford pattern for the dress and I have to say I was absolutely positively 100% pleased with the pattern.
You can read more about my love affair with Coni here:


For those of you who don’t know, the commercial pattern companies are notorious for having terrible fitting patterns. The reason for this is that they make a sloper (the basic building block of all pattern drafting) in a sample size –usualy a 6 I believe- and use it to draft all patterns and then they grade (resize the pattern) from this standard pattern.

the basic sloper pattern

Well that would be all fine and dandy except they use terrible grading techniques and always add too much in the wrong places which means that unless you are lucky enough to fit the standard size the pattern is going to have lots of fitting issues.

Why do they do this you may ask?
 Well because A. it saves time and B. it saves printing cost cause it uses less paper.


Well Coni Crawford believes this is UNEXCUSABLE so she teamed up with Butterick patterns to start her own pattern line.

I have always heard good things about her patterns and everyone claims they actually fit because she...

 wait for this

 it’s such a crazy idea you’ll never believe it

Are you ready?

They fit because she actually makes a sloper (the basic building block of a pattern) in every size and drafts every size separately!

But wait!

 It gets even crazier! She designs the sloper off of actual human bodies!

What a truly novel idea.

I mean seriously. Talk about genius.

So I had to give her patterns a try.

Twila and I picked out this pattern.


I had to alter it slightly because Twila was between two sizes and then I cut out and sewed the muslin together.


Twila came over for her first fitting today and I was all prepared to have to make a TUN of alterations, but then Twila put the muslin on and Dun Dun Dun.
 Guess what happened.


It mostly fit!


Just a few minor changes, throw in a pair of Spanks and Huston, we have lift off!


Err, um, I mean we are in the clear to cut out the fancy fabric.
I would show you the fabric, but then that would ruin the surprise and what’s the fun in that?
I'll give you a hint:
We use 2 fabrics!!!


Oh, ps. The pattern was a joy to work with for reasons beyond the fit. For example, for anyone who has ever installed a Lapped Zipper you may have noticed that you would have liked a little more fabric to work with. Well Coni ADDS extra seam allowance where the lapped zipper will go so you don’t have to remember to do that yourself!!!!!!

 I was stoked.
Twila was happy too.
And Cordelia was happy cause we were happy.
She is such a follower.

Overall I rate this pattern an A+! You go Coni cause I know you were sooo looking for my approval.


Until next time,
~Melisa & Cordelia


Wednesday, October 27, 2010

Oh My Gosh!

So yesterday I told you all about my BFF Heather Ross who is my BFF even though she doesn’t know it.
Well today I’m going to talk about her some more because I have just discovered these.


That’s right those are shoes made with Heather Ross fabric!

I am in love.
This right here, is the definition of my ideal shoe. Well almost. It would be 100% absolutely totally perfect if it were a Converse instead of a Keds. For those of you who don’t know, I have a bit of a Converse problem. I am an addict. And, even though I have reached the first step of recovery: admitting I have a problem, I have no desire to progress any further. Maybe someday I’ll show you my collection. Or maybe not because I don’t want you to think I’m a crazy shoe girl.


Anyways, back to the Heather Ross shoe.

The white with roses are my favorite.  I'd show you a picture but the web sight won't let me copy it. 

 In case you’re wondering, I wear a size 8.
Hint hint hint.
I’m just saying, Christmas isn’t that far off and I would love to make your shopping easier.


Visit this website and check them out. 


 Go, you’ll be glad you did!


Happy Shoe Shopping
~Melisa & Cordelia

Tuesday, October 26, 2010

Rapunzel Messenger

Meet my BFF Heather Ross.


"Hello Heather!" Says Cordelia.


"__________" Says Heather.

Cause, well, I've never met her.


Ok, sure she has no idea I exist, but I want to be just like here when I grow up because she does cool things like write one of my favorite sewing books.


 Check it out, you’ll love it too, if only cause it has sleek glossy pages with beautiful poictures and she throws in a few recipies too which is nifty.

She also designs fabric and I absolutely adore all of her collections, but don’t get her confused with my other BFF Heather Bailey who also designs fabric. You can read all about here her if you wish.


So Heather Ross recently came out with a new line called Far Far Away II and is inspired by fairy tales.


 Have I mentioned, I love fairy tales?
Well I do. They are amazing and when I saw this Rapunzel fabric I almost just about died cause Rapunzel was my FAVORITE fairy tale growing up.


 Well except maybe for the Princess and the Pea. I can relate so well to that one. Or the 12 dancing princesses. I always wanted to find myself in the enchanted forest.

Anyhow, I bought the fabric cause it was cute and I used it to make this messenger bag.


I love this bag cause it has a convenient pocket here in the front.


And because it is reversible.


The reverse side also has pockets in the front and the flap.


This bag is so handy you should make one, and if you are nice I may actually get around to making a pattern and if you are really really nice I might share it too.
 But don’t let Cordelia get a hold of it cause she’ll just dangle it in front of you and refuse to hand it over.
She can be a bit bratty like that.

Happy fairy tale reading
~Melisa & Cordelia


Monday, October 25, 2010

The One in which a Web Master was Born

Here is the reason why nothing on my to-do list got crossed off today.


That’s right. This one little website kept me so sufficiently distracted all day that I could not possibly get any work done.

Granted I was distracted because I was building the website, and I guess that can count as work. Advertising is good. But now all I want to do is play with my new website! I am addicted. Someone call the web builders version of AA. I’m gona be needing a support group soon—mostly cause I suspect there are way cooler things I could be doing with the sight if only I knew how!

So here is the sad pitiful old Hart Design website which is so pathetic I didn't even like telling people about it.


And here is the new sparkly grown up one.


 What do ya think?
Did you catch any typos?
 How do you feel about the music playing? I can’t decide if it’s a good thing or not.
Any thoughts?
Ideas?
Did you figure out the photo albums move?
(The Papa Hart missed that one)
Suggestions?
 Anyone?
 Hello?
Anyone still reading?
I guess not.
 In that case:


You got to have Hart!

-Corazone, corazone-

Miles and Miles of Hart!

-Corazone, corazone-


Oops sorry. 
We thought we were alone and Cordelia and I had a brief song and dance party.
It’ll most likely never happen again.

Happy Web Designing!
~Melisa & Cordelia


Sunday, October 24, 2010

The DressCoat Incident

So the other day I was cleaning out my old computer and I came across this little piece of embarrassing past memories: an essay I wrote back in the day when I was applying for a job with Teach for America. I didn’t get the job (probably because I seriously question the programs effectiveness) but this essay did land me an interview and I wrote about sewing. Go figure. 


What you are about to read is mostly true and only slightly dramatized for entertainment purposes.

 
      “Nnnnooooooo!” my high pitched shriek echoed through the apartment. I was two days away from the due date of a coat project I had spent several weeks working on for one of my design classes, and I had just inadvertently sabotaged the front section of my coat. The assignment had been an easy one: I was to create a coat to demonstrate mastery of basic and intermediate sewing skills. The project had been going well until I lost control of my scissors hand and accidentally slashed through my fabric leaving a three-inch gash in the center front of the coat. I was doomed. I was unlikely to hide a hole the size of the Grand Canyon from my professor and submitting the coat in the current condition was inexcusable. To make matters worse, my solutions seemed limited and impossible. With enough fabric I could have cut out a new front section and completed the project. But I did not have enough fabric, and I had purchased the fabric at a store two hours away; there was no time for a mini road trip. Alternatively, I could buy new fabric and start the coat over, but two days was not enough to create an entire coat. I seemed to be stuck.

 
       I am not the type to give up, however, and I was determined to find a solution. I took a few yoga breaths to remain calm and it hit me; I would make the hole look as if I had put it there intentionally. I grabbed my favorite sewing book and started flipping through it. I opened to a section on pockets and the headline for welt pockets caught my eye. The welt pocket is a technique commonly found in high quality garments. It is an advanced method; one I had read about but had never attempted because one step involves slashing the fabric. I wondered if I could build the pocket around the preexisting slash. I believed I could, and I was up for the challenge. My hands were trembling as I took my fist stitches and my body forgot to breath. This had to work.

     It took me several hours to produce the pocket, but the effort was worth it because I had created a flawless ( I might have fibbed a bit about this) single welt pocket, solved my tragedy and completed the project by the due date. Blagh blagh blagh. This is where the essay starts to get mushy as I try to make it clear that I would be a good employee and I’m not going to bore you with that.

But here is a picture of the infamous coat and not quite flawless welt pocket.


 And for the record, I now make a mean welt pocket.

 That is why they call me the


Wait


For


It


The Weltinator Dun dun dun!

Happy reminiscing
~Melisa & Cordelia

Saturday, October 23, 2010

They Done Listened!

Well a few days back I wrote a blog entry where I shamelessly requested readers adopt Cordelia and me and give us all their cool collections. Well someone listened, adopted us and sent us some cool stuff. I was shocked how well my evil plan worked.


Granted it was my Aunt Connie who already claims me (which is convenient cause she’d be stuck with me whether she liked it or not), and who has been giving me cool stuff my entire life, and who was probably already planning on sending me this cool stuff, but I am choosing to overlook these few minor, itty bitty, teeny tiny details.

So you must be wondering what cool things the Mail Man brought me and Cordelia?

“Cordelia, what do ya think? Should we show them what we got?”

“Yes? “

Ok, lets go then.

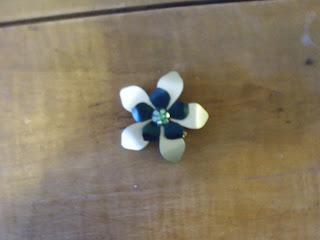
First I discovered an assortment of vintage jewelry which came from my Uncle Larry’s mother. None of it’s anything fabulous, but there were some neat peaces I’m sure I’ll have fun playing with.


Here are a few of my favorite pieces. Sorry about the sub par photos, I couldn’t figure out how to set my camera correctly.

But the here’s the real icing on the cake.


Check out these puppies.


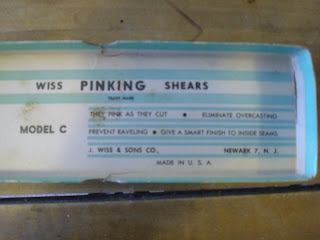
They are Pinking Shears!


They pink as they cut!
They eliminate overcastting!
 They prevent raveling!
And they give a smart finish to inside seams!
And, according to the back of the box, someone payed a most impressive $1.95 for these things. 
 Talk about a good deal.

These suckers belonged to my Great Grandma, who as Aunt Connie told me in her note, “always cut her fabric on the kitchen table.” Aunt Connie also mentions she “remembers her (great grandma) using them to cut fabric with dress patterns pinned to it.”

To which The Mama Hart replied,
“Momma never used pins! She used tea cups! And she never really fallowed the pattern: she just cut wherever she wanted it seamed. But I do think she preferred to sew than cook.”


Well who could blame her?
 Sewing is waaaaaaaay better than cooking.
No competition.

Thanks for adopting Cordelia and Me Aunt Connie!


Happy using your Great Grandma's sewing supplies!
~Melisa & Cordelia


Thursday, October 21, 2010

How to draft an A-line skirt from Measurements

Today I thought I would share how to draft the basic A-line skirt using your own measurements. Prepare yourself to be amazed how utterly easy this is.


First you’ll need some measurements. I’ve included some hypothetical measurements for your reading pleasure.
 Or are they hypothetical?
Perhaps I’ve plastering the Internet with my measurements.
Or Cordelia’s measurements.
 Or Oprah’s measurements.
But you’ll never know for sure so:
 Bwhahahahahaha.
That’s my evil laugh in case you were wondering. Speaking of evil laughs, if you had an evil villain identity, what would it be? I would go with Countessa Dark Hart. Cordelia’s still working on her evil minion identity, and most people think Oadie is already pure evil so I guess he’s already got that covered. But I degrees. Back to the skirt.

Here are the measurements you will need:

Waist-measure this where you want the waist of the skirt to hit—on some of us that’s not at the actual waist—although the high waisted skirt is rocking this season and for good reasons!

Hip-Measure the fullest part of the hip

Waist to hip-measure the vertical distance from where you measured the waist to where you measured the hip. On most gals this is somewhere between 6 and 11 inches.

Waist to Hem- measure the vertical distance from where you measured the waist to where you want the hem of the skirt to hit. Aka, how long you want the skirt to be. I like to measure down the center front of the body. If you have an especially generous backside measure down the center back too. You may have to draft a slightly different pattern for the back.

For Clarity sake here are my hypothetical (or not) measurements:

Waist: 28”

Hip: 40”

Waist to hip: 10”

Waist to hem: 20”


Now you have to do a little math. But before you panic, don’t worry, it’s only a little basic math and you are allowed to use a calculator.

First we need to factor ease into the pattern. Ease is how much extra room you have in your clothes so you can do things like move and sit. I like to put about ¼ to ½ inch ease in the waist of my skirts (I find if I use much more the skirt sits too low on my waist) and about 2” in the hips.

So this is what the math looks like:

Waist 28” + ¼” ease = 28 ¼”

Hip 40” + 2” ease = 42”

Easy right? Have I lost anyone yet? Let’s hope not.

Now comes the tricky bit: When you draft a pattern you are only dealing with ¼ of the body at a time. Think of it this way, you cut the fronts and backs out separately so this divides the body in half and then we are going to draft the pattern on the fold which divides the body in half again. Make sense? Well let’s move on and hopefully it’ll clear things up a bit.

 Because we are working with ¼ of the body we have to do a little more math and divide the waist and hip measurements by 4. It will look like this:

New Waist 28 ¼” ÷ 4 = 7 1/16”

New Hip 42” ÷ 4 = 10 1/2”

Waist to hip: 10”

Waist to hem 20”

This is a time when you should go ahead and use fractions no matter how much your fifth grade self may protest. Trust me, you’ll be glad you did, cause really, who knows what 0.23567 of an inch is?

Now we can start the drafting process. Grab a good sized piece of paper. I like to use butcher paper I picked up at my local restraint supplier, but you can also try to bum some off the newspaper printers, or “borrow” the onion paper you doctor uses to cover her exam chair. Or in a pinch, use the back side of wrapping paper, but I find this tears easily so be delicate with it.


Fold your paper in half.


Along the fold, near the top mark a spot for the waistline. Draw a line perpendicular from the fold to represent the waistline.


Measure down the distance from waist to hip and mark. Draw a line perpendicular from the fold at this point to represent the hip line.


Measure down the distance from waist to hem and mark. Draw a line perpendicular from the fold to represent the hem.


Go back to the waistline. Take your new waist measurement divided by 4 (7 1/16” in this case) and measure this distance from the center fold. Mark.


Mark ¼” to 5/8” above the first mark. This will give you the waist curve. If you are blessed with a pair shaped figure go higher. If you have an apple shape go lower for a less curvy waistline. I used 3/8” .


Use a curved ruler or French curve to connect this new mark to the fold.


Move down to the hipline. Take your new hip measurement divided by 4 (10 ½” in this case) and measure this distance from the center fold. Mark.


Move down to the hem. Figure out how much fullness you want in the skirt. For an A line skirt I usually make the hem about 8-16 inches wider than the hips. In this case I took the hip measurement divided by 4 and added 2” inches (12 ½” in this case). Measure this distance from the center fold. Mark.


Use a curved ruler to connect the waist and hip marks.


Use a straight edge to connect the hip and hem marks.


To mark the hem, use a yardstick to make sure the length from waist to hemline is consistent.


Why hello pajama pants.  I strongly recommend wearing PJ's when you sew.  Comfort is key!


Use a curved ruler to make the hem line nice and purty.


Add seam allowances to the waistline, side seam and hem.
I used 1/2" cause it's easy to measure.


Cut out.


The center fold becomes the grain line.


Mark the pattern with your name, a reminder to cut 2 and I like to add the date.


And there you have it: an A-line skirt that should fit you beautifully!

Maybe tomorrow I’ll show you how to draft a gored skirt. Or maybe I’ll show you a totally amazing vintage maternity suit. Or maybe I won’t do anything. That’s the Contessa Dark Hart using her evil teasing skills to keep you on your toes. Bwhahahahahaha.