
Today I taught a class on how to make this wrap skirt. 


Which also reverses to look like this:

And, because I’m lazy and didn’t want to print a whole stack of directions, I thought I would post them here and share with the world!
Ok, so let’s get started on our wrap skirts!
First we will have to draft the pattern for the skirt using our own measurements. Be prepared to see how utterly easy this is to do!
First you’ll need some measurements. I’ve included some hypothetical measurements for your reading pleasure.
Or are they hypothetical?
Perhaps I’m plastering the Internet with my measurements.
Or Cordelia’s measurements.
Or Oprah’s measurements.
Or Oprah’s measurements.
But you’ll never know for sure.
Bwhahahahaha!
So go ahead and take these measurements:
Waist-measure this where you want the waist of the skirt to hit—on some of us that’s not at the actual waist—although the high waisted skirt is rocking this season and for good reasons!
Hip-Measure the fullest part of the hip
Waist to hip-measure the vertical distance from where you measured the waist to where you measured the hip. On most gals this is somewhere between 6 and 11 inches.
Waist to Hem- measure the vertical distance from where you measured the waist to where you want the hem of the skirt to hit. Aka, how long you want the skirt to be. I like to measure down the center front of the body. If you have an especially generous backside measure down the center back too. You may have to draft a slightly different pattern for the back.
For Clarity sake here are my hypothetical (or not) measurements:
Waist: 27”
Hip: 41”
Waist to hip: 11”
to hem: 23.5”
Now you have to do a little math. But before you panic, don’t worry, it’s only a little basic math and you are allowed to use a calculator.
First we need to factor ease into the pattern. Ease is how much extra room you have in your clothes so you can do things like move and sit. I like to put about ¼ to ½ inch ease in the waist of my skirts (I find if I use much more the skirt sits too low on my waist) and about 2” in the hips.
So this is what the math looks like:
Waist 27” + 1/2” ease = 27 1/2”
Hip 41” + 2” ease = 43”
Easy right? Have I lost anyone yet? Let’s hope not.
Now comes the tricky bit:
We are drafting what is referred to as a 5 gored skirt. Which means the body of the skirt is divided into 5 different sections, so we will be dividing our measurements by 5.
Make sense? Well let’s move on and hopefully it’ll clear things up a bit.
Because we are working with 1/5 of the body we have to do a little more math and divide the waist and hip measurements by 5. It will look like this:
New Waist: 27 1/2” ÷ 5 = 5 1/2”
New Hip: 43” ÷ 5 = 8 5/8”
Waist to hip: 11”
Waist to hem 23.5”
This is a time when you should go ahead and use fractions no matter how much your fifth grade self may protest. Trust me, you’ll be glad you did, cause really, who knows what 0.23567 of an inch is?
Now you have one more step in the math process.
We are only going to draft half of the pattern at a time so we need to divide the current hip and waist measurements in half.
So here are the final measurements we will use:
Final Waist: 5 ½” ÷ 2 = 2 ¾”
Final Hip: 8 5/8” ÷ 2 = 4 5/16”
Waist to hip: 11”
Waist to hem 23.5”
To clarify things even more, ( I hope) I have designed a little chart for you to use. I still have not figured out how to attach a word document so you will have to make your own chart, but it should look a little something like this:
******************************************************************
Wrap Skirt Measurement Chart
GORE
Waist________
Waist + ½” for ease =__________
Waist with ease ÷ 5 =___________
½ of above number = ___________
Hip_________
Hip + 2” ease = _____________
Hip with ease ÷ 5 = __________
½ of above number = _________
Waist to Hip_________
Waist to Hem________
Waist Band
Waist X 3= _________
************************************************************************
Now we can start the drafting process.
Grab a good sized piece of paper. I like to use butcher paper I picked up at my local restraint supplier, but you can also try to bum some off the newspaper printers, or “borrow” the onion paper you doctor uses to cover her exam chair. Or in a pinch, use the back side of wrapping paper, but I find this tears easily so be delicate with it.

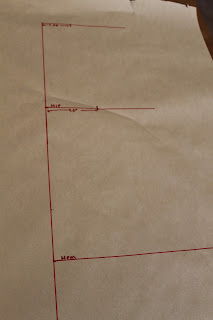
Draw a straight line the length of the skirt. This will become the center of the gore and the grain line.

At the top of the line, draw a perpendicular line. Measure over the distance of the final waist measurement and mark.


From the waist line measure down the waist to hip distance. Mark.

At this point draw a perpendicular line. Measure over and mark the length of the final hip measurement. (this is the minimum width for a fitted skirt, but you can have more ease for a fuller skirt).


From the waist, measure down to the hem length and mark.

Determine how full you want the skirt to be. One way to do this is to measure a skirt you already own and like and divide the hem width by 5. Draw a perpendicular line the length of ½ this measurement. Or for a semi circle skirt I like to add 2-4 inches to the hip measurement.

At the waist, measure up 4” from the side seam point.

Draw a curved line connecting this mark with the center line. This becomes your waist line--it is curved because we don't have straight waists.

Draw the side seam line by connecting the waist and hem lines. If you want a fitted skirt, you will first draw the curve from the waist to the hip and then draw a line from the hip to the hem. For a fuller skirt, you can draw a straight line connecting the waist and hem lines.


To draw the hem, measure the desired skirt length from the waist line. The hem should be slightly curved.


Ignore my top row of marks--I fergot how long I wanted the skirt to be.

Add ½” or 5/8” Seam Allowance to the waist, side seam and hem. Because this skirt is reversible, you do not to include additional length at the hem.


Fold the paper in half on the first center line and cut out on seam allowance lines so both sides are symmetrical.

If you wish, copy two more pattern pieces for ease in cutting.
Go ahead and mark the pattern. Note that the center of the pattern is the grain line and that you will need to cut 6 panels. I also like to include the date the pattern was drafted (cause bodies change you know) and who it was drafted for.

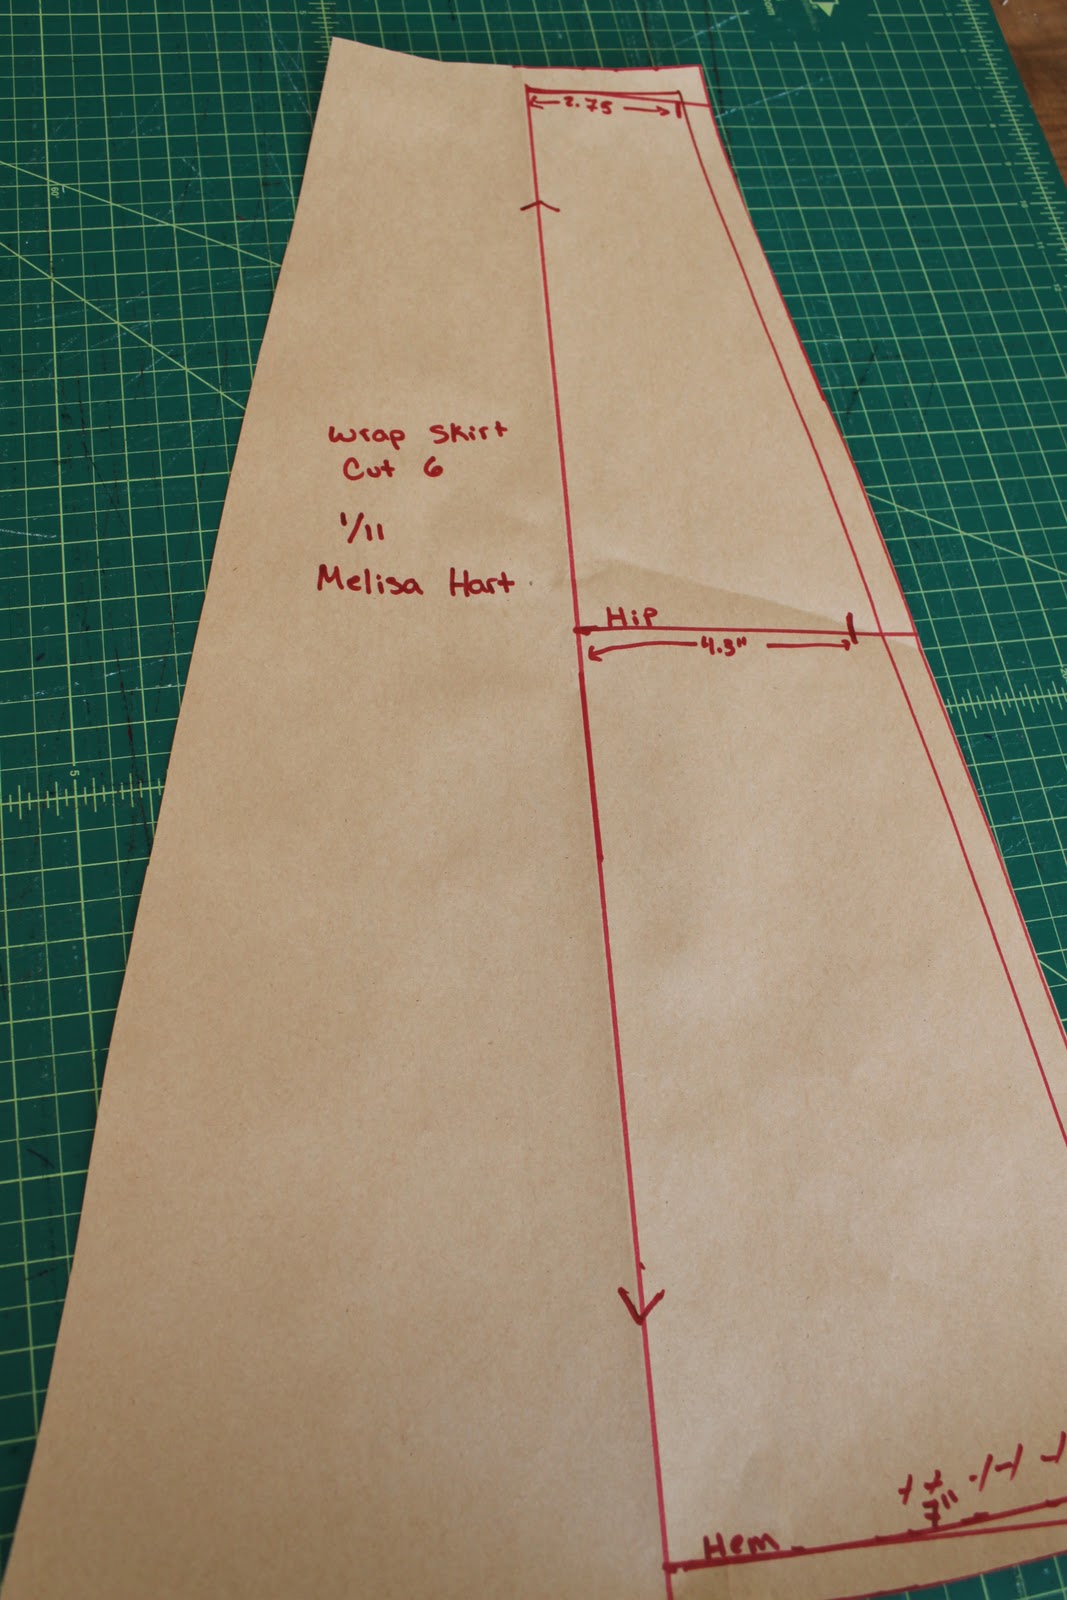
For the waist band, draw rectangle that is 3X the waist measurement long by 2 1/2” wide. If you wish, you can angle the ends to make a point.


Check back tomorrow and we will discuss how to cut out the skirt!
Great tutorial!!! I have always wanted to make a wrap skirt and this is a bonus because it is reversible. I have a question about the curved waist...in your directions you say to measure up 4 inches, but it looks more like a 1/4 of an inch. Also about how much fabric did you use for one side? Thanks a lot for your time, you make me aspire to sew more!
ReplyDeleteHi Leslie,
ReplyDeleteI apologize for the typo. At the waist I measure up 1/4". I usually buy 2 yards of fabric per side, but if you want your skirt longer or are working with a directional fabric I would get a little more!
Thanks for reading my little blog!
Melisa
This is a pattern I would love to try!
ReplyDeleteThank you for the tutorial. i was given a wrap skirt and I will try your instructions and see what happens! I'm enthusiastic for an awesome outcome. I have to be finished before tomorrow evening!
ReplyDeletethanks again!
rahmah
if we are cutiing 6 gores ,shud not we divide waist and hip measurement by 6 instead of dividing it by 5. not sure just want to confirm.
ReplyDeleteI think since it's a wrap skirt you need the 6th gore to count as the extra length to wrap around you. Does that make sense?
DeleteThank you for the tutorial. I have been looking for a reversible wrap skirt pattern for my 9 year-old, to no avail. Now I can just make one! One question...when you say to "measure the hem width of an existing skirt", does that mean to lay the skirt flat and then measure across, or measure all the way around the bottom of the skirt? Thanks so much!
ReplyDeleteThanks for this great tutorial. I have never thought that the process of making wrap skirt could be so easy. Heads off to you. Keep it up.
ReplyDeleteWrap Around Skirt
Nice post thankks for sharing
ReplyDeleteI love how detailed these instructions are!
ReplyDeleteTo mark “the curve of the waist”, your instructions say to measure 4” up from the seam line and mark. At what angle is this line crated? The seam-waist line is a right angle (correct?) to measure 4” up would that be a 45* angle?
ReplyDeleteFrom your instructions:
“At the waist, measure up 4” from the side seam point.”